Announcement

Collapse
No announcement yet.

My Clubman Blog

Collapse
X
 
  • Filter
  • Time
  • Show
Clear All
new posts

  • #31
    Hi All
    Sorry I have not updated for a while but I have been busy with other things, so busy I did not manage to get down to the NEC last weekend either!!!!! Anyway back to matters Maestro, time to remove Elvis the A series, still on the transfer list if anyone is interested.


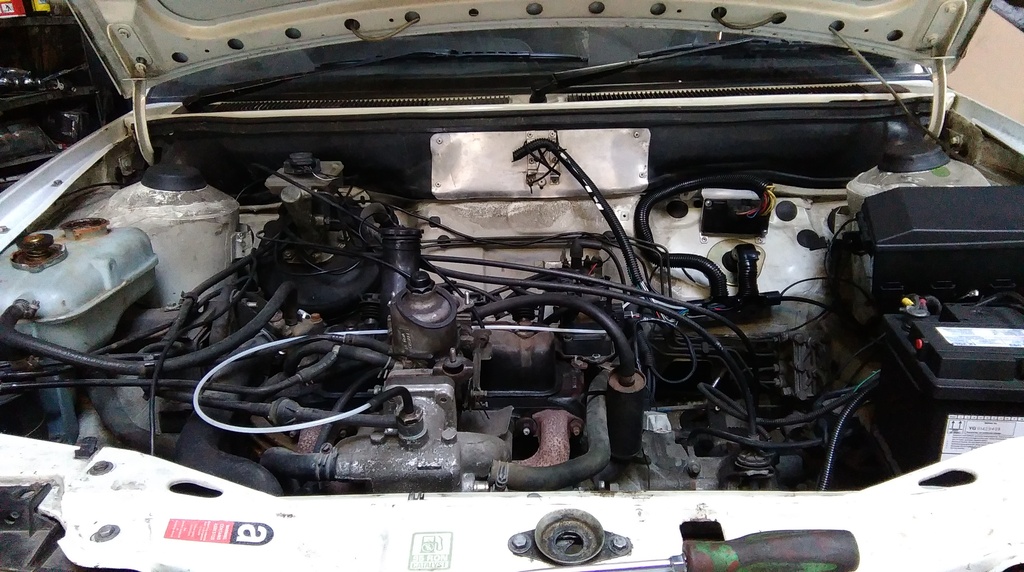
    A last picture of Elvis in his old home where he has lived for many years.


    The removal was quite straight forward, front pipe off along with the gear linkage, drive shafts out along with hubs and wishbones and the subframe. Then block the engine and gearbox up with a pallet and undo the engine and gearbox mountings and remove the body. Simples!!!

    [IMG]file:///C:%5CUsers%5CDavid%5CAppData%5CLocal%5CTemp%5Cmsoh tmlclip1%5C01%5Cclip_image001.gif[/IMG]
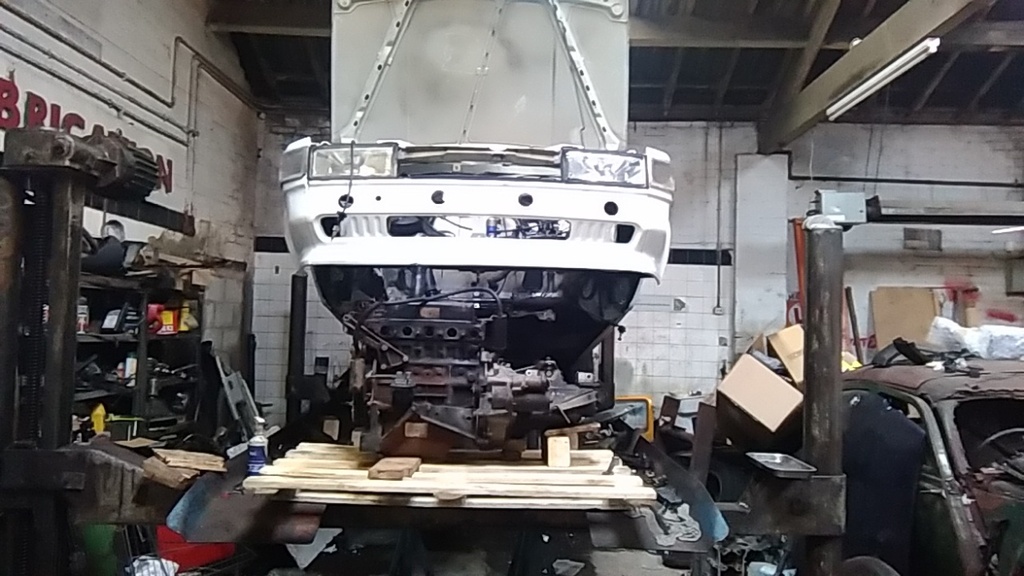
    Up up and away.


    Ladies and Gentlemen Elvis has left the building…………..
    Sorry for the weak pun.
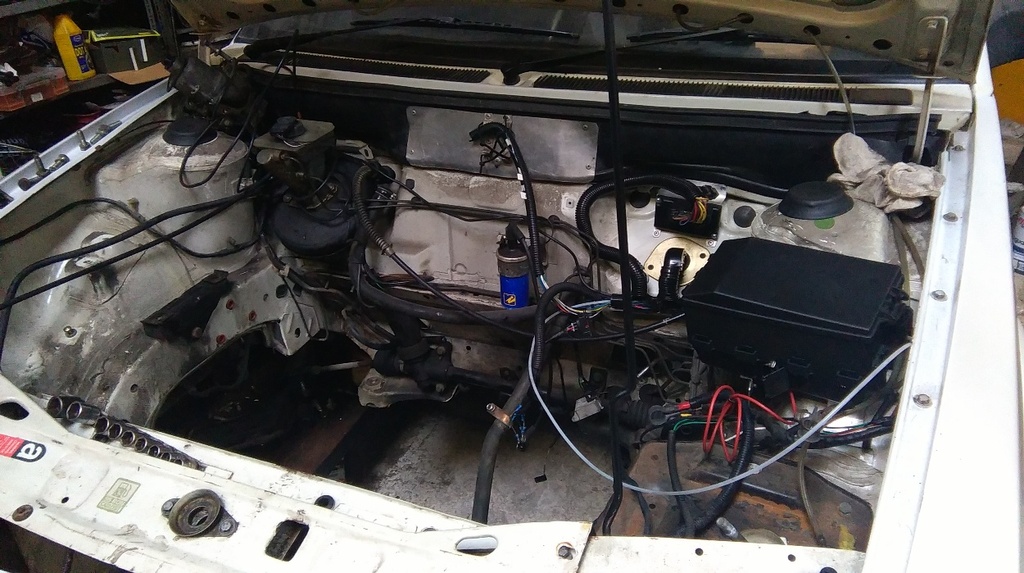
    Because the gearbox being fitted is a derivative of the 2000 O series PG1 with effectively a different bellhousing to fit the K series I was confident that the main nearside gearbox mount that fastens onto the chassis rail would fit unmodified along with the mounting under the diff. So a MG front subframe was fitted along with the 2 mountings that I was sure would fit which indeed they did. A Brucey Bonus was that the front mounting also fitted so I know the gearbox is in the correct position which means that I have only the main engine mounting to make along with probably a lower engine stabiliser as well.


    A picture of the ex rally car “lift the gearbox an inch” mounting which slipped beautifully into place, I expected to have to modify this one.
    Finally because you do I, with the dummy block bolted in I popped a head on it to try manifold clearances and to see how it all looked, all in all an enjoyable and fruitful day.


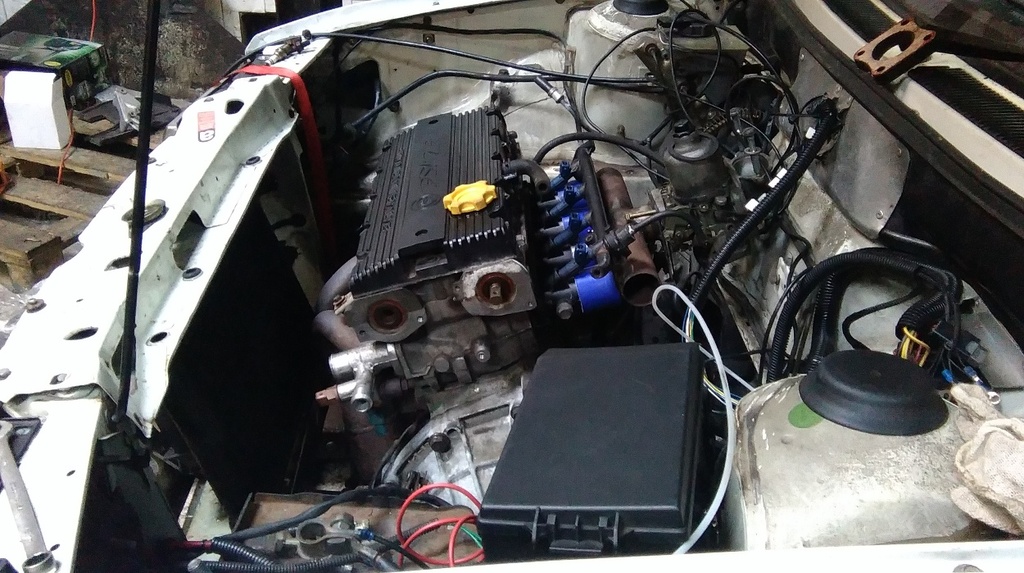
    The Manifold that I have nearly finished making is a very temporary measure simply to get the engine running again before the throttle bodies and Megasuirt kick in.

    Thanks for looking all comments welcome
    Last edited by toonarf; 21st May 2018, 07:58. Reason: Photograph replacement
    My Car Story

    http://www.maestro.org.uk/forums/showthread.php?t=20252

    Comment


    • #32
      I'm lost for words, but AWESOME would do for now. That installation looks so neat. Superb work!
      M&MOC Committee Member - Archivist
      Join the M&MOC | Visit the Club Shop | Printable Club Flyer (PDF)

      Comment


      • #33
        Hi All
        Sorry I have just checked and its 6 weeks since I last updated, at the time I though a couple of weeks should have seen me up and running, sadly as ever I have had very little spare time to spend on the car. However looking back I have made quite a lot of progress. This picture, a copy of one already shown in a previous post, shows a dummy empty block that I got for trial fitting. I have since fitted the complete engine that I am going to use.


        As stated before the 3 gearbox mounts all fitted and all that left to sort was the main engine mounting. Looking in the area I could see that it would be easiest if I could place the mounting on the most level area of the chassis rail and use the factory fit mounting holes. To achieve this would need a mounting bracket that was a longer than the Rover car ones and also moved the centre of the mounting backward quite a distance. There is almost too much room between the chassis rails......... After a bit of research (Ebay, where else would you find pictures of engine mountings?) I discovered that the Landrover Freelander mounting seemed to fit the bill so one was duly bought and luckily it bolted straight onto the Lotus Elise lower mount that I already had. A rummage in my box of “will come in useful one day” crap, produced a pair of Escort Cosworth engine mountings which perfectly fitted the Freelander bracket. A bit of fabrication and the result is a no doubt over engineered engine mounting that required no extra holes.


        Another view of the mounting sorry about the photo quality I am not fully upto speed with my new phone. Next is remove it again hopefully for the last time for a while, trim excessive metal, some final bits of welding and paint it.


        I think the top steady bracket that comes over from the inner wing may be over kill but it weighs very little and can be removed if I decide it is not needed. I have also nearly finished the loom to operate the temp gauge, oil light and alternator.


        So at this stage I have the engine mounted, and fastened to the gearbox and with standard MG Maestro drive shafts fitted, along with the gear linkage, the clutch connected and releasing, and the gearbox full of oil. I also have most of the cooling system plumbed in using a remote thermostat kit. Jobs to complete are now down to finish the wiring, start and finish the fuel system adaptations, cobble an exhaust system together finish the cooling system and finally change the head gasket water pump and cam belt and then start it up. If I can finish this lot by September I can be on the road before the MOT runs out, I took the precaution of having it tested last year after the bodywork was done.

        Thanks for looking and feel free to comment even if only to ask WHY !

        David
        Last edited by toonarf; 25th May 2015, 18:58.
        My Car Story

        http://www.maestro.org.uk/forums/showthread.php?t=20252

        Comment


        • #34
          A photo of the underside of the mounting, you can just make Iveco out on the round part, so Lotus, Ford, Landrover and Iveco truly a team effort.


          A better photo of the upper side of the mounting.
          #


          This shows better what I meant about the rails being too far apart.

          I was talking to a mate today about the project and he remembered seeing a Montego with a K series when Rover were first developing it. He worked at a BL dealers and it was driven by a BL rep. He said the rep said it went really well and revved forever. It would have been a pre production 1400.

          Thanks for looking
          My Car Story

          http://www.maestro.org.uk/forums/showthread.php?t=20252

          Comment


          • #35
            Im surprised this has all gone together so easily! Good to know you can mostly use off the shelf parts to do this conversion.

            Nice solution for the drivers side mount.. thats why I never throw stuff out! I would say the upper part attached to the inner wing isnt necessary

            Out of interest I assume the standard shafts have the correct amount of plunge at full suspension compression and droop without modification?

            Comment


            • #36
              Hi Ross

              I originally lifted and rotated the engine in the old rally car engine bay to allow me to fit a higher flatter design of the sump guard, the original one if fitted when I started rallying it suffered with a very acute angle to accommodate the “lump” that sticks out at the front of the bell housing on the O series version of the PG1. This low mounting position made the sump guard “dig in” when landing after a jump. It also made the car a bit unstable under braking if it started rubbing on a raised crown on the road and lifted weight and grip off the front end.

              So I spaced the diff mounting up by only about 10mm and then rotated the rest of the engine and gearbox around the new centre line of the diff. This raised the front cross member mount by about 35mm with the 2 side mounts correspondingly less. This allowed the sumpgaurd to be redesigned with a much higher profile with a much less acute angle. So other than the diff being raised in this new install by the same 10mm that the rally car had, all the rest of the drive shaft angles and positions are in the standard place, which should result in no problems. We have never had more than wear and tear problems with drive shafts, certainly we never broke one without breaking the suspension first. Where the normal K series install angle leans forward I have made it lean forward a bit less. The K series PG1 box is the same as an O series or T/M series apart from the unique bellhousing. That is why I strongly suspected that my rally car mounts would fit OK. The bonus was the front mounting fitted as well so the diff has to be in the same place in the shell.

              I had another look back through your thread and your mounts make mine look very second rate time to get them powder coated I think.

              David
              Last edited by toonarf; 14th July 2019, 08:36. Reason: For Grammer
              My Car Story

              http://www.maestro.org.uk/forums/showthread.php?t=20252

              Comment


              • #37
                Hi all, I see its over 6 months since I updated this journal of the progress on my Maestro. As ever I can only plead a lack of time, I just never seem to have any spare time. Anyway jobs completed this Summer include finishing the engine mounting arrangements, finishing the cooling system and mostly finishing the fuel system, the engine should run with the fuel set up but needs more work to be useable on the road. The head gasket water pump and timing belt have all been changed, the new engine management loom is finished and has been tested for continuity off the car and just needs a few final tests on the car. This management loom is now fitted to the car. So the reason for the post is that all being well, subject to a final few checks and fitting some kind of exhaust on I should be trying for a start this weekend.

                Here is a picture of the installation as it is at the moment.


                The Ford plug leads will not fit down the K series head and so I need to get a set of leads to run the engine with, I have a K Series set that need cutting to length and the Ford ends adding but that is an after it runs job.

                I have the weekend pencilled in to spend some time on the Maestro and so sometime over the weekend there should be another report, hopefully with good news.
                Thanks for looking as always comments are welcome.

                David
                My Car Story

                http://www.maestro.org.uk/forums/showthread.php?t=20252

                Comment


                • #38
                  Two views of todays progress, I had a day owed and spent the morning sorting a few loose ends, rad in, water in, oil in, throttle cable on cam cover fitted etc and finally plugs in after the pictures.


                  And the big news is a first time start!!!!!!!…………………………………………………….
                  So my self assembled ECU controls a Ford ignition system on a Rover engine with a home altered flywheel and after about 3 turns of the starter and it was away. To say I am chuffed is an understatement, I have been aiming for this on and off for 4 years.
                  Thanks for reading and as ever any comments are welcome.

                  David
                  My Car Story

                  http://www.maestro.org.uk/forums/showthread.php?t=20252

                  Comment


                  • #39
                    Excellent work.

                    *doffs cap*
                    www.maestroturbo.org.uk - The Tickford Maestro Turbo Register
                    www.rover200.org.uk - The Rover 200/400 (R8) Owners Club
                    www.roverdiesel.co.uk - My Rover Diesel Site

                    Comment


                    • #40
                      I know the feeling after my T16 conversion, hearing the engine run for the first time really is quite an indescribable moment. Well done.

                      Ian
                      Ian Drew
                      MG Maestro Turbo '400'
                      MG ZT V8
                      Rover 75 V6 Estate

                      Comment


                      • #41
                        Hi All

                        So last week I had it running and to say I was chuffed was an understatement, but there was little point in going any further with tuning it because I did not intend to continue using the original Rover inlet manifold. I used the Rover manifold as an easy, safe way to get it running, it was never going to be the final solution.

                        A repeated picture from last week showing the engine with Rover intake.


                        A picture from tonight, notice it is now fitted with the ability to make a bit more noise, last years’ Christmas present, a set of Suzuki GSXR 600 injection bodies, mated to a cut down plastic rover manifold. The picture shows the engine running, I did take a video but the light was to low and the sound quality is awful, but we now have a bark.


                        Sorry the photo quality is not great again, maybe I was so excited I couldn’t hold the camera still, or maybe the lighting is poor?

                        I also have had my first electrical gremlin which is why the Rover manifold is lying on the strut top, I think I have wired the throttle potentiometer from the Suzuki bodies wrongly and I am not getting a throttle signal that makes sense, so the Rover throttle is providing one. Looks like its multi meter time.

                        On an unrelated matter I noticed that the drive shaft boots are splitting and need changing before the test, the shafts came from the H reg Monstro , I don’t think my local motor factors were in the right mood when I asked them for boots and said I would have to fit universal boots. But I checked a First Line catalogue and they do list Maestro/ Montego drive shaft boots. Now I thought that all PG1 drive shafts were the same petrol, diesel, MG turbo and Turbo diesel, but first line lists 2 a bit randomly across the range, so the question is are there two different styles of shaft and if so how do I know what I have?

                        Cheers

                        David
                        My Car Story

                        http://www.maestro.org.uk/forums/showthread.php?t=20252

                        Comment


                        • #42
                          Hi all

                          I have a couple of questions if I may, are all PG1 CV joints/ boots and shafts the same? I need to order new boots and need to know where I am aiming at. I have fitted the shafts from the H reg Monstro shown earlier. Secondly I need to sort a speedo cable, all I have coming out of the gearbox is the Lotus speedo drive gear shown below. I supposed a Maestro/ Montego Diesel cable would be what I wanted, without the speed sensor bits, but my local factor (who I spend enough with in my day job and so will allow me to order random parts which if they are wrong they will take them back) do not list a cable just for the diesel, is this correct and so means I need to source the speed sensor parts to use a petrol cable?


                          Finally while they are not very expensive I bought this in case of a rainy day.


                          Thanks for looking and as always any comments welcome.
                          David
                          Last edited by toonarf; 22nd December 2015, 20:39. Reason: Double post
                          My Car Story

                          http://www.maestro.org.uk/forums/showthread.php?t=20252

                          Comment


                          • #43
                            Hi All

                            Again humble apologies for a lack of updates about my Clubman, as usual my excuse was lack of time, although a job change will now enable more free time So this summer the car will be on the road. I have been working through my to do list that I created last year…… but I am only a couple of weeks from an MOT.
                            I have replaced the brake master cylinder, every time I left the car for a few weeks the pedal would go to the boards on first application and then be perfect.
                            I have also fitted a spoiler from an MG, I think it wants to be white not black, it makes the rear look “heavy or busy” what do you think?


                            Thanks for looking

                            David
                            Last edited by toonarf; 12th March 2017, 21:53.
                            My Car Story

                            http://www.maestro.org.uk/forums/showthread.php?t=20252

                            Comment


                            • #44
                              Hi All

                              I have now insured the Maestro for 12 months, along with my other classic car, so the pressure is on now to get an MOT. I booked an MOT last week but on the drive to the test station it became apparent that I had not resolved the drive shaft/ diff seal question. The drive shafts walked out slightly followed by the gearbox oil. So a slow drive of a mile back home followed.
                              Today I removed the shafts and took off the inner joints and I have now identified what the problem is and which, I hope, will be cured by fitting the correct diff seals. I was previously thrown by my shafts having the groove machined in the inner faces of the joints, I did not realise the groves were the small early style. The seals that I have ordered are TRX100100 and TRX100110 which according to my researches are standard later PG1 Maestro / Montego seals. They do not appear to be available from Rimmers but I found some on Ebay. So next job is fit the seals when they arrive and then re book a test.

                              Thanks for looking and as ever any comments are welcome

                              David
                              My Car Story

                              http://www.maestro.org.uk/forums/showthread.php?t=20252

                              Comment


                              • #45
                                Absolutely brilliant, I have no idea how I've missed this thread before! Looks fantastic David, I've always wanted to do the conversion but not had the guts to start! I look forward to more updates. PS not sure about the rear spoiler, it's a completely different look with having the steel bumpers.

                                Comment

                                Working...
                                X