Announcement

Collapse
No announcement yet.

The Rally Maestro project

Collapse
X
 
  • Filter
  • Time
  • Show
Clear All
new posts

  • #16
    If you look at the turret behind the lower spring pan on the shock you'll see a curved seam from the turret to the inner wing. The bottom of this takes some hammer and rusts out in the vans particularly. But on very rough terrain this seam is likely to be a weak point and would benefit from some seam welding and maybe some re-inforcement.


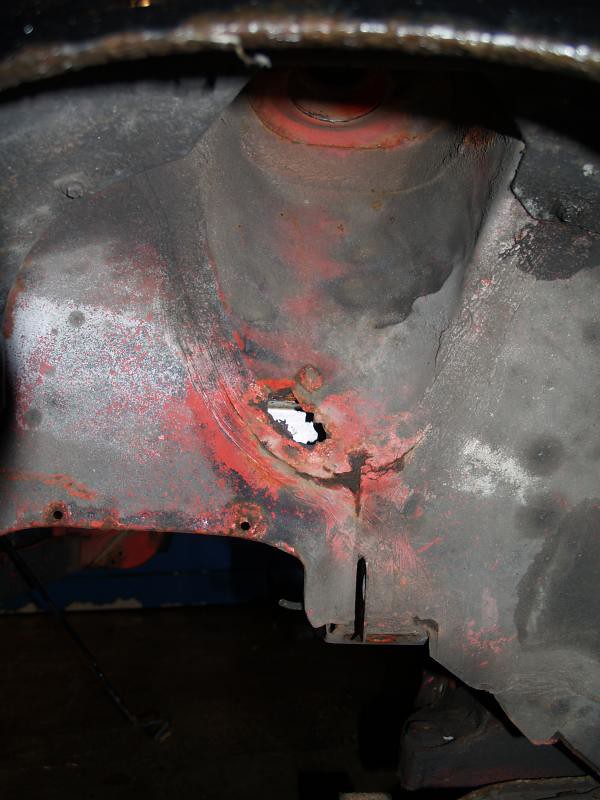
    This is the rot in my old van, (offside - suspension strut removed)
    www.maestroturbo.org.uk - The Tickford Maestro Turbo Register
    www.rover200.org.uk - The Rover 200/400 (R8) Owners Club
    www.roverdiesel.co.uk - My Rover Diesel Site

    Comment


    • #17
      That photo was seen by everyone at Tony Fowkes Autos today and some welding and additional plating around the front turrets is now in hand.
      Silver foil stuck to the roof with the adhesive from Car Builders Sollutions looks great - terrific glue! The original headling board wont go in tho until the inside of the car is painted. Tony is putting some small-bore tubing in behind the corner sections of the front bumper to beef them up up a bit and make them more nerf-proof.

      Thanks to Russ10, club member, for the new exhaust downpipe, saw that today in a box of bits, looks good - thanks for your help with this.

      MGDavid has the latest batch of photos.
      Last edited by Philip Young; 10th June 2011, 20:44.

      Comment


      • #18
        just back from Spa, and am now in Poole for work 2 days so will load pic links in a day or 2
        midget1380@btinternet.com

        Comment


        • #19
          Pictures to follow later this week then from MGdavid. Meanwhile, Tony Fowkes has spent the weekend attending to the front struts with new metal around the inner wing area following that photo above, and strengthening the tops inside the bonnet area. Other bits of strengthening going on in the floor area around the doors, where the floor and sill join up, and removing more sound-deadening bitumen in the footwell areas.

          .... The inside is going to be painted white hopefully later this week.

          Alas, the sumpgaurd from Hen has yet to turn up.

          Comment


          • #20
            One vital thing I think we have all failed to mention this far is the notoriously unreliable fuel pump on the S series engines.

            Best to replace this with an electric pump as they are very prone to failure.
            If you don't stop using the mechanical pump now, then please take a spare or fit an electric one ready to swap as/when needed.
            www.maestroturbo.org.uk - The Tickford Maestro Turbo Register
            www.rover200.org.uk - The Rover 200/400 (R8) Owners Club
            www.roverdiesel.co.uk - My Rover Diesel Site

            Comment


            • #21
              so, the roof has been insulated before refitting the headlining


              and further strengthening of the shell, this time on the inner sill to floor join


              midget1380@btinternet.com

              Comment


              • #22
                I think I may steal that bubble wrap idea for my campervan as my mates van seems to work well with this inside too.
                www.maestroturbo.org.uk - The Tickford Maestro Turbo Register
                www.rover200.org.uk - The Rover 200/400 (R8) Owners Club
                www.roverdiesel.co.uk - My Rover Diesel Site

                Comment


                • #23
                  wheels

                  I was thinking, wouldn't it be better to use steel wheels that can be beaten back into shape if you bend one on a rock - alloys will just crack, break or shatter leaving you having to change it and throw it away.
                  midget1380@btinternet.com

                  Comment


                  • #24
                    Yes. Certainly a lot of sense in going with steel wheels, so easy to tap out a dent in the rim with a screwdriver and hammer. After the Classic Car Show in November will be the time to change them, pehaps, Countrydude has offered to help - his sollution was 5.5 steel Monty rims, in 14 inch, which sounds just the job.

                    Comment


                    • #25
                      Seems sensible to have a wheel that can be easily repaired - but all the rally Landcrabs had minilites with big tyres on them. And there are many more images like the ones below on the internet. There must have been a reason that they opted for these over the original steel wheels in an era when alloys weren't the norm.


                      Comment


                      • #26
                        Nice pictures.

                        I used to own the SMO car (it was an immaclate black car and was used for its shell and many other bits to give a revival to a very rusted out ex-works recce car, I sold the car to someone who wanted to restore something that was really beyond restoration. Its done well - it came 2nd overall on the London to Cassablanca, and 3rd on the Nile Trial).

                        Those Minilites were magnesium, in the era, and thats the difference, they were incredibly strong, you could get a puncture and limp on to the clock at the end of a stage on the rim, many Minis did that thanks to the inherent strength in a Minilite. The many copies of the classic design are alloy today, and yes alloy wheels have improved a lot, but... they are brittle, as MGdavid says. So, steel would make sense, but hey, this is all being ruled by the heart over the head, so we press on with what would/could have been a works Maestro. The finishing touches are going to be carried out by several ex-works mechanics who served in the competitions-department.

                        The question is whether a Maestro can be built to hammer across two Continents for over 8,000 miles in a month, and come out at the end of it as well as the 1800 landcrabs like the ones above.
                        Last edited by Philip Young; 15th June 2011, 22:10.

                        Comment


                        • #27
                          Just remember to tell them to fit an electric fuel pump as the mechanical ones are well known to fail.
                          www.maestroturbo.org.uk - The Tickford Maestro Turbo Register
                          www.rover200.org.uk - The Rover 200/400 (R8) Owners Club
                          www.roverdiesel.co.uk - My Rover Diesel Site

                          Comment


                          • #28
                            Just about to paint the inside now. Fitted a footrest to the floor on the passenger side, and a smaller clutch-foot brace/rest plate on the drivers side (both come as a kit from Car Builders Sollutions of Staplehurst, good for nick-nacks and gizmos). The front turrets now look a lot more substantial, with welding and additional metal-work top and bottom.

                            Had a couple of days off (got asked to make up the numbers of a small party flying in a wartime Dakatoa to Normandy, the plane's owner then wanted a driver for an ex-works Healey on the Tour Britannia...couldnt do better than 4th, look, I know what you are thinking... its a hard life, but someone has to do these things). While away playing, Tony Fowkes has been beefing up the Corbeau recliner-seats mounts, as the universal kit you get from Corbeau while good, needed a bit of reinforcement for off-road punishment.
                            Last edited by Philip Young; 20th June 2011, 23:59.

                            Comment


                            • #29
                              You may like to add a horn button to the passengers foot rest in parallel to the drivers button, and make sure that you have the twin-tone horn setup rather than the more weedy single beep one.

                              The standard plastic grill is flimsey so put some wire mesh behind it at least to stop big stones going through the radiator.
                              www.maestroturbo.org.uk - The Tickford Maestro Turbo Register
                              www.rover200.org.uk - The Rover 200/400 (R8) Owners Club
                              www.roverdiesel.co.uk - My Rover Diesel Site

                              Comment


                              • #30
                                Agreed, thanks for that.

                                Comment

                                Working...
                                X